


A. Site selection:
25 traps will be provided to most groups; those receiving different amounts can adjust these instructions accordingly. We will leave it to the group leaders to decide whether they wish to have their students place these traps at residences, or to develop a group activity to sample for mosquitoes at a common place, such as school property or a nearby park. Those who have traps from last year are welcome to set those out as well. All you would need are new filter liners, which are Bunn filters for 12-cup coffee makers.
It will be impossible for all the collecting sites to be the same, or in some cases even comparable, since participants come from places as diverse as Chicago, IL and El Paso, TX. Perhaps the most relevant measure of mosquito abundance would be found where people live, so we suggest that the students take these home and place them somewhere near their homes. The traps will not be attractive to mosquitoes unless they are placed in areas that are shaded all day long.
Younger children might need help from a parent. Please inform the parents of what you are asking the children to do, and assure them that there will actually be (slightly) fewer mosquitoes in their area, and that there is no risk of disease from handling the traps—mosquito bites are required to transmit mosquito-borne disease.
B. Sampling period:
Try to establish a 2-week sampling period as early in September as possible, so our sites are sampled in a consistent manner. Using a standard period is critical for us to be able to make comparisons between sites and between years. Although it is preferable to do this in the early part of September, what is most important for our study is that your sampling period remains the same from year to year.
C. Materials and trap assembly
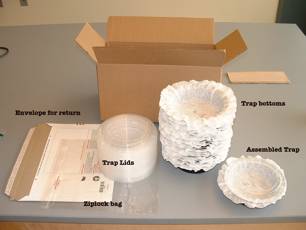
1. Assembled trap. This is one of the 25 traps.
2. Trap bottoms (24), including liners (coffee filters). Leaves have been inserted beneath each coffee filter because mosquitoes are attracted to the smell of leaves decomposing in the water.
3. Trap lids (24). These are the clear plastic covers with the holes cut in them. Their primary purpose is to keep the filter paper in place and protected. The may also help to keep the traps from drying out. Careful, the holes have rough edges and may scratch.
4. A Ziploc bag for packaging the paper liners
5. An information sheet to return to us about trap locations
6. A mailing envelope for returning the liners to us (differs from picture).
You need to provide:
1. Tap water. 12 ounces is a convenient amount, since it’s a soda can full.
2. A well-shaded location for each trap
3. The nearest street address for each trap location on the information sheet
4. The prompt return of the liners
5. Patience in waiting for results. We will have to process over 1400 trap liners if everyone follows through. If you wish to give your students quick results, you can use last year’s results with this year’s classes (they’ll never know the difference!!).
Instructions:
1. Snap lid over edge of paper liner. This is easiest if you start with one side, and pinch the two parts together working your way around the edge. There is a pinch of leaf litter between the paper and the black plastic trap bottom. This is deliberate, so please don’t remove the leaf litter—mosquitoes are much more attracted to water with leaves decomposing in it.
2. Add 12 oz. of water (use an empty soda can) per trap
3. Place trap in a shady spot for 14 days. North sides of large trees in wooded areas are good sites, but many other shady situations should also be attractive to mosquitoes.
Important: please have students add water to these traps every 2-3 days, as they will dry out in less than a week. Have them bring the water level up to within a half inch of the top of the black plastic. Once the traps dry out, they’re not attractive to mosquitoes and much more likely to blow away.
We suggest that an additional step be taken to prevent the trap from being blown away or hauled off by a dog or a deer—perhaps a branch or flat rock could be laid over the trap without blocking the hole, or some other means of securing the trap in place could be devised. One of our group leaders has suggested tent pegs or croquet wickets, and wire surveyors flags have also been used to anchor the traps. We welcome all suggestions.

4. Remove lid, discard water, and return the trap liners to class. Encourage students to fold the liner so the paper completely covers any possible eggs that may have been laid in the trap. Our web site will have photos of trap liners that have eggs.
5. Important: Please allow the liners to dry, for about a day. We would rather not have the problems of water seeping out and ruining the mailing envelope. Liners that are packed too wet can deteriorate, making it very time consuming to process them.
6. Please fill out the information sheet provided, or (preferably), download the information sheet from the web
(http://www.clarku.edu/faculty/tlivdahl/mc09info.xls) and return that by email to tlivdahl@clarku.edu. This would save us a lot of typing.
7. Stack the liners and place inside the ziplock bag, and send them back to us in the mailing envelope provided, along with the information sheet. Please include a printed copy as backup to any electronic copy you send. The envelope has already been metered for the correct postage, assuming that you’ll be sending back 25 damp trap liners. For larger quantities, we have added more postage. Please check to see that sufficient postage is provided before you mail the package. If it comes up short, let us know and we'll compensate you for the difference.
We realize that traps will be lost, kids will forget to do what you've asked, and many other things will prevent you from getting all the trap liners back. It has happened many times, so don't be concerned if these things happen to you.
Please see our web site, for additional information and illustrations, and don’t hesitate to contact us if you have questions: Todd Livdahl, tlivdahl@clarku.edu 508 793-7514.
Many thanks for your participation!